Uploading File Data to Production Order Ax 2012
This browser is no longer supported.
Upgrade to Microsoft Border to take reward of the latest features, security updates, and technical support.
Data direction overview
Of import
The functionality noted in this topic is currently available in both the stand-alone Dynamics 365 Human being Resource and the merged Finance infrastructure. Navigation might be different than noted while nosotros make updates. If you demand to find a specific page, y'all can use Search.
This topic describes how you can utilise the data management framework to manage data entities and data entity packages in Finance and Operations.
The information direction framework consists of the following concepts:
- Information entities - A information entity is a conceptual brainchild and encapsulation of ane or more underlying tables. A information entity represents a common data concept or functionality, for case, Customers or Vendors. Information entities are intended to be easily understood by users familiar with business concepts. Later on information entities are created, y'all can reuse them through the Excel Add-in, utilise them to define import/export packages, or employ them for integrations.
- Data project - A project that contains configured information entities, which include mapping and default processing options.
- Data job - A job that contains an execution instance of the information project, uploaded files, schedule (recurrence), and processing options.
- Job history - Histories of source to staging and staging to target jobs.
- Data package - A single compressed file that contains a data project manifest and data files. This is generated from a data job and used for import or export of multiple files with the manifest.
The data management framework supports using data entities in the following core data management scenarios:
- Data migration
- Set up and re-create configurations
- Integration
Data entities
Data entities provide conceptual abstraction and encapsulation of underlying table schema that stand for information concepts and functionalities. In Microsoft Dynamics AX 2012, most tables, similar the Customer and Vendor tables, were de-normalized and carve up into multiple tables. This was beneficial from a database design point of view, but made it difficult for implementers and ISV'due south to use without a thorough understanding of the physical schema. Data entities were introduced as part of data management to be used as a layer of abstraction to easily empathize by using business concepts. In previous versions there were multiple ways to manage data, such as Microsoft Excel Add-ins, AIF, and DIXF. The concept of data entities combines those different concepts into one. After information entities are created, you should exist able to reuse them for an Excel Add-ins, import/consign, or integration. The post-obit table shows core information management scenarios.
| Data Migration |
|
| Setup and re-create configuration |
|
| Integration |
|
Information migration
Using the data management framework, you lot tin quickly migrate reference, primary, and document data from legacy or external systems. The framework is intended to help yous chop-chop drift data past using the following features:
- You can select but the entities you need to drift.
- If an import mistake occurs, yous can skip selected records and choose to proceed with the import using only the skilful data, opting to and so prepare and import the bad data afterwards. You will exist able to partially keep and employ errors to chop-chop detect bad data.
- You can move data entities directly from 1 system to another, without having to go through Excel, or XML.
- Data imports can exist easily scheduled using a batch, which offers flexibility when it is required to run. For example, you can drift customer groups, customers, vendors, and other data entities in the system at whatever time.
Set and copy configuration
Yous can apply the data direction framework to copy configurations between companies or environments, and configure processes or modules using Microsoft Dynamics Lifecycle Services (LCS).
Copying configurations is intended to brand it easier to beginning a new implementation, fifty-fifty if your team doesn't deeply empathise the structure of data that needs to exist entered, or information dependencies, or which sequence to add data to an implementation.
The data direction framework allows you to:
- Move information betwixt 2 similar systems
- Discover entities and dependencies between entities for a given business concern procedure or module
- Maintain a reusable library of data templates and datasets
- Use information packages to create incremental information entities. Information entities can be sequenced inside the packages. You can proper name data packages, which can be easily identifiable during import or export. When building data packages, data entities tin can be mapped to staging tables in grids or by using a visual mapping tool. Yous can also drag-and-drop columns manually.
- View data during imports, so you lot can compare information, and ensure that it is valid.
Working with information entities
The following sections provide quick snapshots of the unlike functionalities of information management using information entities. The goal is to assist to you strategize and brand effective decisions on how to all-time utilize the available tools during data migration. You lot will also find tips and tricks on how to effectively use each area during data migration. A list of available data entities for each area tin also be institute with the suggested data sequences, showing information dependencies. Microsoft provides information packages that can exist establish on Lifecycle Services (LCS) as an initial guide. The information in this document can exist used as a guide for creating your own packages. The clarification of each information entity shows what the object contains and if it is needed during data migration.
Sequencing
At that place are ii types of sequencing that should be considered when working with data entities.
- Sequencing data entities inside a information package
- Sequencing the order of data package imports
Sequence data entities inside a information package
-
When a user adds data entities to a data project, by default, a sequence is fix for the order in which the entities will load. The first entity added to the project will be set equally the get-go entity to load, the side by side entity added will be second, the next entity will exist third, and so on.
For example, if a user added ii entities in this order, Sales tax codes and Sales Tax groups, and then Sales revenue enhancement codes is assigned an entity sequence of 1.1.i, and Sales tax groups is assigned an entity sequence of i.1.2. The sequence level indicates that the 2d entity will not start the import procedure until the first level is finished.
-
To view or edit a sequence, click the Entity sequence push button on the Action Pane of the data project.

-
In the Definition group entity sequence, you tin can encounter the execution units and the sequence. You tin change sequence by selecting the information entity in the list, setting a unlike Execution unit or Sequence in level, and so clicking Update selected. Later clicking Update selected, the entity will move upwardly or down in the entity listing.
Example
The following screenshot shows the entity sequence that is set for the Sales Tax CodeGroups data package.
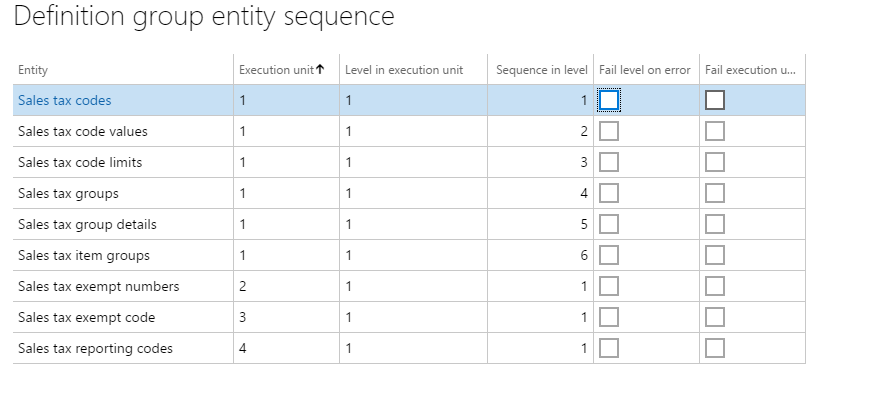
In order to successfully import sales tax codes and groups, the sales taxation codes and details have to be loaded starting time, before sales tax groups can exist imported. Sales taxation codes and groups are all in Execution unit = 1, but the sequences are in the social club that they will exist imported. Other related sales tax entities that are not dependent upon other data entities being loaded are included in the packet. For example, sales tax exempt numbers is fix in its own Execution unit of measurement = 2. This data entity will start loading immediately because there are no dependencies on other entities loading earlier it.
Sequence data package imports
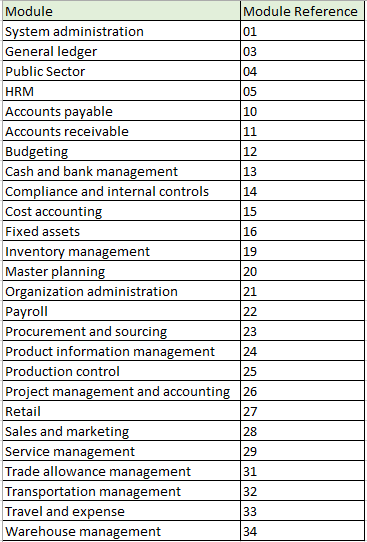
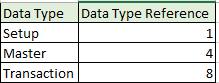
In order to successfully load data, it's of import to set up the correct order for importing data packages, because of dependencies that exist within and beyond modules. The numbering format that has been created for the data packages within LCS are equally follows:
- Commencement segment: Module
- Second segment: Data type (setup, chief, transaction)
- Third segment: Sequence number
The following tables provide more information most the default numbering format.
Module numbers
Data blazon numbers
Sequence number
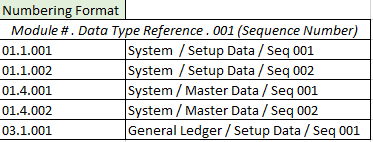
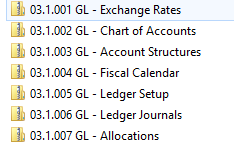
Information packages follow the sequence number, followed by the module abridgement, and then a clarification. The post-obit instance shows General ledger data packages.
Mapping
When working with information entities, mapping an entity to a source is automatic. The automatic mapping of fields can exist overridden if needed.
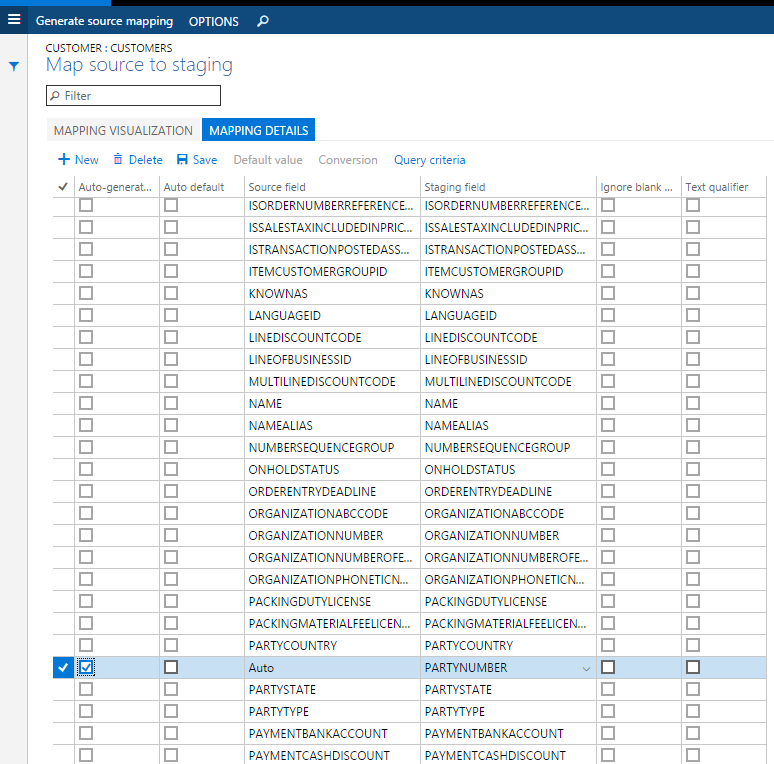
View mapping
To view how an entity is mapped, locate the tile for the entity in the project, and and then click View map.
Nosotros provide mapping visualization view (default) and mapping details view. A red asterisk (*) identifies whatsoever required fields in an entity. These fields must be mapped in order to work with the entity. Other fields can be unmapped as required when working with the entity.
- To unmap a field, highlight the field in either column (Entity or Source), click Delete selection, so click Salvage. After saving, close the class to return to the project.
The field mapping from source to staging tin also be edited after import using the aforementioned procedure.

Regenerate a map
If you take extended an entity (added fields) or if the automatic mapping appears to exist incorrect, the mapping of the entity can be regenerated in the Mapping course.
-
To practice this, click Generate source mapping.
A message volition display asking, "Do you want to generate the mapping from scratch ?"
-
Click Yeah to regenerate the mapping.
Generate data
If yous have fields in entities that you want the system to generate information for on import, instead of providing the data in the source file, you can use the auto-generated functionality in the mapping details for the entity. For instance, if you want to import customers and client address information, simply the accost information was not previously imported with the Global Accost Book entities, you can accept the entity auto-generate the party number upon import and the GAB information will be created. To admission this functionality, view the map of the entity and click the Mapping details tab. Select the fields that y'all want to auto-generate. This will change the source field to Auto.
Turn off automatically generated number sequences
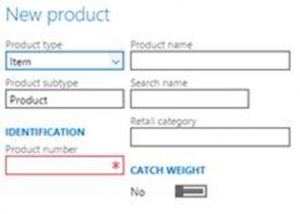
Many entities support automatic generation of identifiers based on number sequence setup. For example, when creating a product, the product number is automatically generated and the class does not allow you to edit values manually.
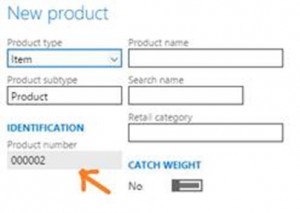
It is possible to enable manual consignment of number sequences for a specific entity.

Later on you have enabled manual assignment, you can provide manually assigned numbers instead.
Export
Export is the process of retrieving information from a system using data entities. The export process is done through a projection. When exporting, y'all have a lot of flexibility every bit to how the consign project is defined. You tin choose which data entities to export, but besides the number of entities, the file format used (there are 14 different formats to choose for export), and apply a filter to each entity to limit what is exported. After the information entities have been pulled into the projection, the sequencing and mapping described earlier can be performed for each export projection.
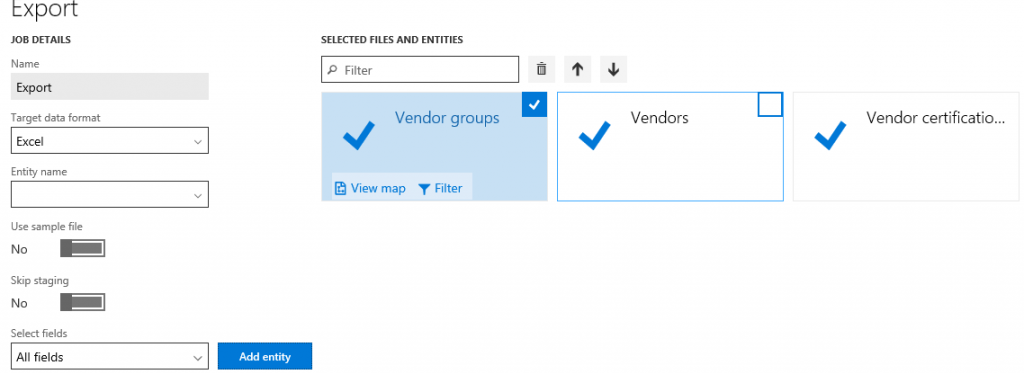
After the project is created and saved you lot tin can export the projection to create a task. During the export process, you lot tin can see a graphical view of the status of the job and the record count. This view shows multiple records and then you tin review the status of each record prior to downloading the actual files.
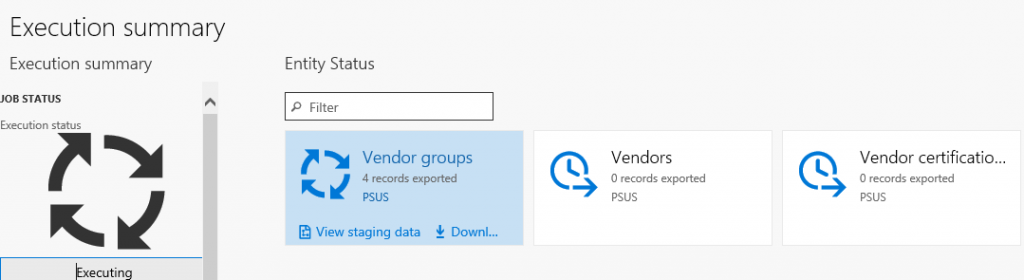

Later on the job is completed you can choose how to download the files: each data entity can exist a carve up file, or past combining the files into a parcel. If there are multiple data entities in the job, choosing the packet option volition speed upwardly the upload procedure. The packet is a nada file, containing a information file for each entity as well equally a package header and manifest. These additional documents are used when importing in order to add the data files to the correct data entities and sequence the import process.
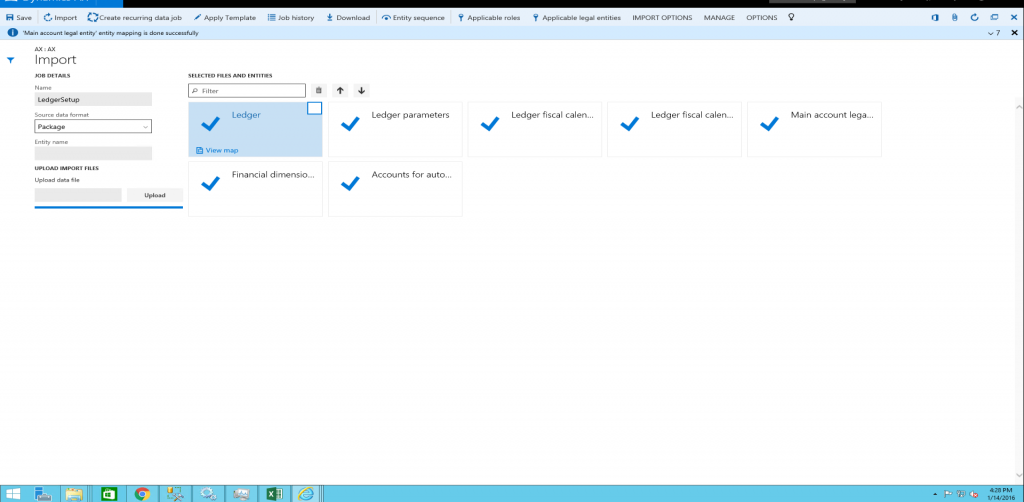
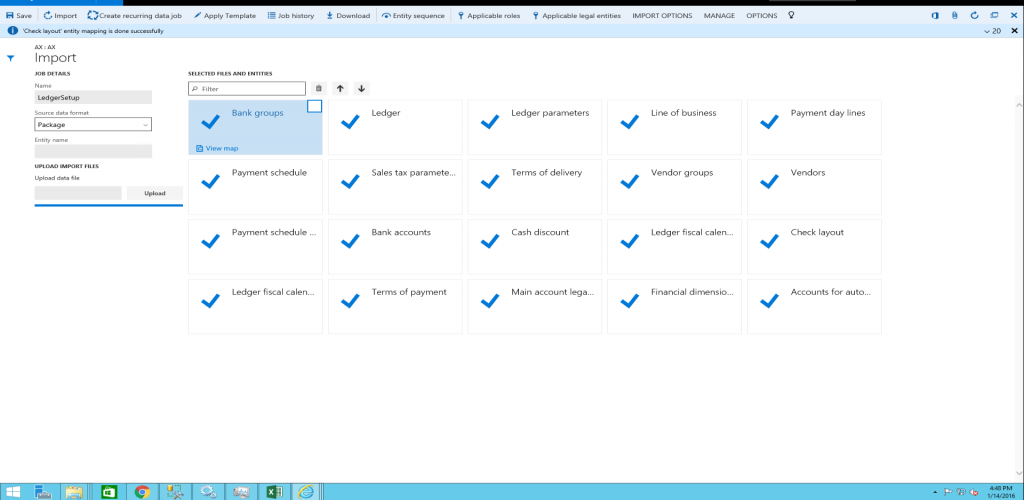
Import
Import is the process of pulling information into a system using data entities. The import process is done through the Import tile in the Information Management workspace. Data tin can be imported either for individual entities or for a group of logically related entities that are sequenced in the correct order. The file formats vary depending on the type of import. For an entity, it can be an Excel file that is comma-separated, tab-separated, or text. For a data parcel, information technology is a .null file. In both cases, the files are exported using the to a higher place mentioned export process.
Import a data parcel
-
Log into the environment using a login with sufficient privileges (typically this is the Administrator office).
-
On the dashboard, click the Information Management workspace.
-
Click the Import tile.
-
On the next page, do the following:
-
Provide a name.
-
In the Source Data Format field, select Package.
-
Click the Upload button and cull the appropriate bundle file from the location for the data being imported. This will import all the files from the package.
-
Click Save, and then click Import.
-
Import multiple data packages
Use ane of the following methods to import multiple data packages.
-
Create a new job for each package, and and so repeat steps 4(a) through 4(d) above, for each package.
-
Create one job to import multiple packages in a sequence. Repeat steps four(a) through 4(c) to a higher place, so repeat stride four(c) for all packages that need to be imported. After you select the packages, execute pace 4(d) to import the data from the selected data packages through a unmarried job.
After you click Import, the data will exist imported through staging tables. The progress of the import tin can exist tracked using the Refresh button in the upper-correct corner of the screen.
Troubleshoot data package processing
This department provides troubleshooting information for the different stages of information parcel processing.
- Condition and error details of a scheduled task can be constitute under the Task history section in the Data direction form.
- Condition and error details of previous runs for information entities can be displayed by selecting a data project and clicking Chore history. In the Execution history course, select a job, and click View staging information and View execution log. The previous runs include information project runs that were executed as batch jobs or manually.
Export process troubleshooting
- If y'all get an error during the export process, click View execution log and review the log text, staging log details, and Infolog for more than information.
- If yous go an mistake during the export process with a note directing you to non skip staging, turn off the Skip staging option, and then add together the entity. If y'all are exporting multiple data entities, you tin can use the Skip staging push button for individual data entities.
Import procedure troubleshooting
When uploading data entity files:
- If data entities practice not display in Selected files and entities after you click Upload during the import process, wait a few minutes, and so check whether the OLEDB driver is still installed. If not, then reinstall the OLEDB commuter. The driver is Microsoft Access Database Engine 2010 Redistributable – AccessDatabaseEngine_x64.exe.
- If data entities display in Selected Files and Entities with a alarm after you click Upload during the import procedure, verify and set up the mapping of individual data entities by clicking View map. Update the mapping and click Save for each data entity.
During data entity import:
- If data entities fail (shown with a red 10 or yellow triangle icon on the data entity tile) after you click Import, click View staging data on each tile under the Execution summary page to review the errors. Sort and scroll through the records with Transfer status = Error to brandish the errors in the Message section. Download the staging table. Gear up a record (or all records) straight in staging past clicking Edit, Validate all, and Copy data to target, or set the import file (non staging file) and reimport the data.
- If information entities fail (shown with a ruddy x or yellow triangle icon on the data entity tile) after you click Import, and View staging data shows no data, become back to the Execution summary folio. Go to View execution log, select the data entity, and review the Log text, Staging log details, and Infolog for more than data. Staging log details will display Error column (field) details and Log clarification will draw errors in detail.
- If data entities neglect, y'all tin can check the import file to see if there's an extra line in the file with text which displays, "This is a cord that is inserted into Excel as a dummy prison cell to make the column to back up more than 255 characters. By default, an Excel destination component volition non back up more than 255 characters. The default type of Excel will exist fix based on the first few rows". This line is added during data export. If this line exists, delete this line, re-package the data entity, and try to import.
Features flighted in data management and enabling flighted features
The following features are enabled via flighting. Flighting is a concept that allows a feature to exist ON or OFF by default.
| Flight proper name | Description |
|---|---|
| DMFEnableAllCompanyExport | Enables BYOD export from all companies in the same consign task (supported for BYOD merely and non files). Past default, this is OFF. This flight is no longer needed after Platform update 27 because this feature can be turned ON using a parameter in data direction framework parameters. |
| DMFExportToPackageForceSync | Enables synchronous execution of data package API export. By default, information technology'south asynchronous. |
| EntityNamesInPascalCaseInXMLFiles | Enables behavior where entity names are in Pascal Case in the XML files for entities. By default, the names are in upper example. |
| DMFByodMissingDelete | Enables the quondam behavior where under certain weather condition, sure delete operations were non synced to BYOD using alter tracking. |
| DMFDisableExportFieldsMappingCache | Disables caching logic when building target field mapping. |
| EnableAttachmentForPackageApi | Enables attachments functionality in the parcel API. |
| FailErrorOnBatchForExport | Enables fail on error at execution unit or level for export jobs. |
| IgnorePreventUploadWhenZeroRecord | Disables 'prevent upload when null records' functionality. |
| DMFInsertStagingLogToContainer | Past default this is ON. This improves performance and functional issues with error logs in the staging table. |
| ExportWhileDataEntityListIsBeingRefreshed | When enabled, additional validations are made on mappings when a job is scheduled while entity refresh is in progress. By default, this is OFF. |
| DMFDisableXSLTTransformationForCompositeEntity | This can disable the application of transformations on composite entities. |
| DMFDisableInputFileCheckInPackageImport | Additional validations are made to ensure if any entity file is missing from a data bundle, error message is shown. This is the default beliefs. If required, this can be turned OFF by this flight. |
| FillEmptyXMLFileWhenExportingCompositeEntity | Prior to Platform update 15, when exporting blended entities that did not take any records to export, the XML file generated did not have any schema elements. This behavior can be changed to output empty schema by enabling this flight. By default, the behavior will withal be to output empty schema. |
| EnableNewNamingForPackageAPIExport | A ready was made to ensure unique names are used for the execution ID when ExportToPackage is used for export scenarios. Duplicate execution ID's were existence created when ExportToPackage was called in quick succession. To preserve compatibility, this behavior is OFF past default. Turning this flying ON volition enable this new behavior where new naming convention for execution ID'southward volition ensure unique names. |
| DMFDisableDoubleByteCharacterExport | A set was made to ensure that data can exist exported when the format is configured to use lawmaking page 932 setting. If an event is encountered in relation to double byte exports, this ready tin be turned off by disabling this flight to unblock, if applicative. |
| DisablePendingRecordFromJobStatus | A prepare was fabricated to ensure that pending records are taken into consideration while evaluating the final status of an import job. If implementations accept a dependency on the status evaluation logic and this change is considered a breaking change for an implementation, this new logic can be disabled using this flight. |
| DMFDisableEnumFieldDefaultValueMapping | A ready was made to ensure that default values ready in advanced mapping for enum fields are successfully saved in the data packet manifest file when generating the data package. This makes it possible for the data bundle to exist used equally a template for integrations when such advanced mappings are used. This fix is protected by this flight and can be disabled if the previous behavior is still needed (which is to always fix the value to 0 in the data package manifest). |
| DMFXsltEnableScript | This flying only applies to Platform update 34 and non-production environments. A set up was made in Platform update 34 to preclude scripting in XSLT. However, this resulted in breaking some functionality that was dependent on scripting. As a consequence, this flight has been turned ON by Microsoft in all product environments every bit a preventive measure out. In not-production environments, this must be added by customers if they encounter XSLT failures related to scripting. From Platform update 35 onward, a code alter was fabricated to revert the Platform update 34 change so this flight does non employ from Platform update 35 onward. Even if you enabled this flying in Platform update 34, upgrading to Platform update 35 will not crusade any negative impact due to this flying being ON from Platform update 34. |
| DMFExecuteSSISInProc | This flying is OFF by default. This is related to a code fix that was fabricated to run SQL Server Integration Services (SSIS) out of in-process to optimize retentivity utilization of SSIS when running DIXF jobs. However, this change has caused a regression in a scenario where if the DIXF data project name has an apostrophe (') in it, and then the chore volition fail with an fault. If you run across this issue, removing the (') in the data project name volition resolve the failure. However, if for some reason the proper noun cannot be changed, then this flying can be enabled to overcome this fault. Enabling this flying will brand SSIS run in-process as before, which could pb to higher memory consumption when running DIXF jobs. |
The following steps enable a flight in a non-production environment. Execute the post-obit SQL command.
For enabling flights in a production surround, a support example must be logged with Microsoft.
-
After running the SQL statement, ensure that the following is prepare in the spider web.config file on each of the AOS's. add key="DataAccess.FlightingServiceCatalogID" value="12719367"
-
Subsequently making the above change, perform an IISReset on all AOS'due south.
INSERT INTO SYSFLIGHTING ([FLIGHTNAME] ,[ENABLED] ,[FLIGHTSERVICEID] ,[Segmentation] ,[RECID] ,[RECVERSION] ) VALUES ('name', 1, 12719367, Sectionalisation, RECID, 1) -
Partition - Sectionalisation ID from the surround, which can be obtained past querying (select) for any record. Every tape will have a sectionalisation ID that must exist copied and used hither.
-
RecID - Aforementioned ID as partition. However, if multiple flights are enabled, and then this can be sectionalization ID + 'n' to ensure information technology has a unique value
-
RecVersion = 1
Additional resources
- Data entities overview
Feedback
Submit and view feedback for
Source: https://docs.microsoft.com/en-us/dynamics365/fin-ops-core/dev-itpro/data-entities/data-entities-data-packages